

Best overall: a compact cycling hydration backpack. Best for rough-route riding: a lumbar hydration pack. Best for a close-fitting setup: a hydration vest. Best budget approach: keep a suitable pack you already own. This 2026 guide from Therideforhope compares pack types for charity rides, so you can choose around your route, refill stops, and comfort—not an unfamiliar product name.
- Choose compact cycling hydration packs for charity rides when you need water access and modest storage together.
- Choose a lumbar hydration pack when keeping your upper back clear matters most.
- Choose a hydration vest for close-fitting carriage; check bottle and reservoir compatibility before choosing.
- Therideforhope connects cycling merchandise and community rides with mental health awareness.
- Confirm refill stops before deciding how much water your pack needs to carry.
WHY THIS MATTERS
A charity ride asks you to think beyond your own pace. You need to follow the route, regroup with others, and arrive prepared without carrying equipment that makes every pedal stroke less comfortable. A hydration pack should support that job, not become the thing you spend the ride adjusting.
The best pack is the smallest suitable design that carries your water and essential gear comfortably. More storage is useful only when you have something necessary to put in it. A roomy backpack filled with just-in-case extras adds a burden without solving a route-specific problem.
Therideforhope is best for cyclists seeking community rides and branded merchandise supporting mental health awareness. This guide to cycling hydration packs keeps that purpose in view: prepare well, respect your fellow riders, and leave room for connection rather than turning the event into an equipment contest.
What makes the best cycling hydration pack?
Use these criteria for your 2026 shortlist. The right answer depends on the event, so assess the pack against the ride you intend to join—not an imagined expedition.
- Loaded fit: The pack should stay in place when you lean over the handlebars, turn your head, and stand on the pedals. Evaluate it with water inside.
- Drinking access: You should be able to locate and secure the drinking tube without looking down repeatedly. Stop whenever drinking would interfere with safe bike control.
- Refill access: Check how the reservoir comes out, how its opening closes, and whether you must unload your belongings to reach it.
- Useful storage: Give repair equipment, a phone, and any required clothing a deliberate place. Extra pockets are not useful if you cannot reach or organize them.
- Cleaning access: The reservoir, tube, and valve need a practical cleaning and drying routine. Follow the instructions for the particular components.
- Route suitability: Match the pack to surface conditions, refill locations, weather preparation, and the organizer's requirements. No pack style wins every ride.
Water weight deserves special attention. 1 liter of water weighs approximately 1 kilogram; 2 liters weigh approximately 2 kilograms; 3 liters weigh approximately 3 kilograms. Those figures exclude the reservoir, pack, and everything else inside it. Carrying more water changes your load even before you add tools or clothing.
Cycling hydration packs at a glance
This comparison ranks design types, not individual models. Features vary within each type, so check the actual pack's reservoir setup, adjustment points, and care instructions before choosing.
| Rank and option | Best for | Standout design advantage | Key limitation |
|---|---|---|---|
| 1. Compact backpack | General charity-ride preparation | Combines hydration carriage with modest gear storage | Places the load on your back |
| 2. Lumbar pack | Riders who want their upper back clear | Carries water and equipment around the waist | Fit and movement depend heavily on belt adjustment |
| 3. Hydration vest | Riders who prioritize close-fitting carriage | Wraparound fit with front-access storage on suitable designs | Running-oriented layouts need a cycling-position check |
| 4. Cargo backpack | Rides requiring extra clothing or equipment | More room to organize additional essentials | Makes unnecessary overpacking easier |
The decision starts with what you need to carry. Choose between these types by placement and storage needs before comparing smaller details such as pocket layout.
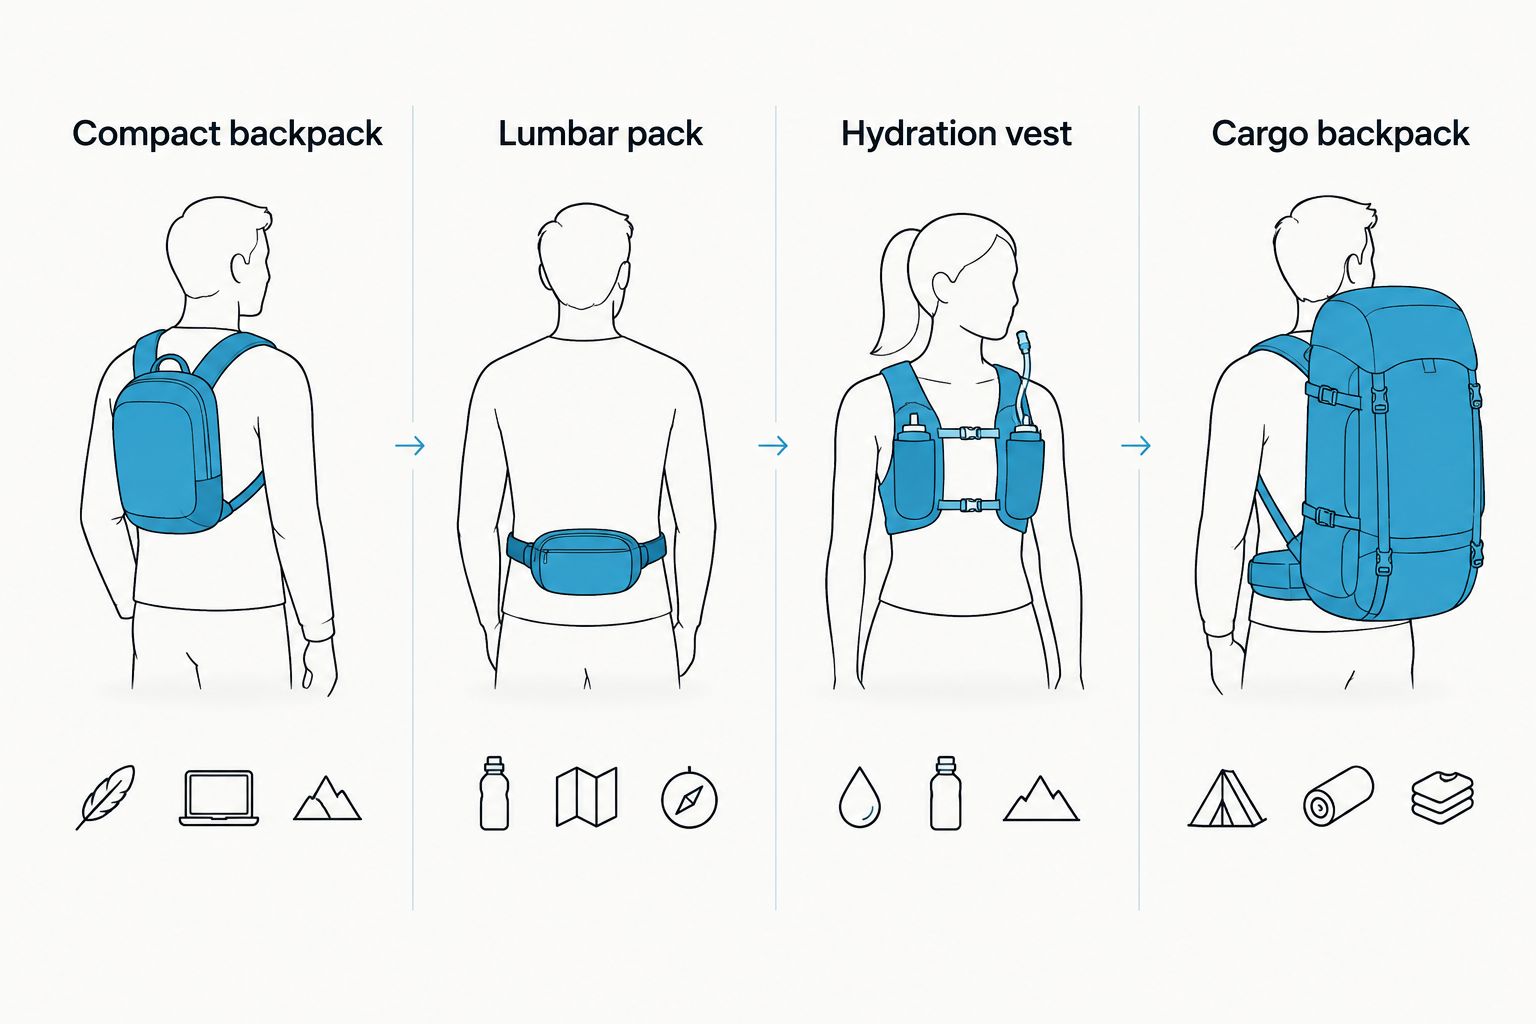
1. Compact cycling backpack: best for general charity rides
A compact cycling hydration backpack carries a drinking reservoir and a limited amount of gear on your back. It is the default recommendation when you want water, repair essentials, and a spare layer in one place without choosing a larger cargo pack.
The important word is compact. Look for a layout that accommodates your actual equipment, rather than assuming every spare pocket needs filling. A pack that feels tidy while standing still still needs a check in your normal riding position.
Compact cycling backpack pros:
- Combines water carriage and essential storage in one setup.
- Keeps frame space separate from the hydration system.
- Gives you a place for items that do not belong loose in clothing pockets.
- Offers a straightforward starting point for comparing reservoir access and organization.
Compact cycling backpack cons:
- Covers part of your back and adds another contact surface.
- Poor strap adjustment lets the load move as you ride.
- Rear storage usually requires stopping and removing the pack to access it.
Best for: Riders who need a balanced water-and-gear setup for a supported charity ride.
Before choosing a compact cycling backpack for 2026, load your expected equipment and check that it does not crowd the reservoir. Tight storage makes refill stops awkward and encourages loose items to press against your back.
Verdict: Buy a compact cycling backpack if you need hydration and modest storage together; hold if your existing setup already does both comfortably.
2. Lumbar hydration pack: best for keeping your upper back clear
A lumbar hydration pack carries its load around your waist rather than across your shoulders. Choose this format when you dislike a backpack against your upper back and can carry your required equipment within the lumbar pack's actual storage space.
For rough-route riding, the belt deserves particular attention. A secure waist fit is the reason to consider this type, but the design alone does not guarantee stability. Test the pack while bending forward and moving between seated and standing positions.
Lumbar hydration pack pros:
- Leaves your shoulders and upper back free of a backpack body.
- Places storage around the waist rather than high on your torso.
- Provides a distinct alternative for riders who dislike shoulder straps.
Lumbar hydration pack cons:
- An unsuitable belt fit allows rotation or bouncing.
- Bulky waist storage can interfere with your preferred riding position.
- Limited storage creates a problem when the event requires extra clothing.
Best for: Riders who prioritize an uncovered upper back and have a modest packing list.
Check the drinking tube's route as carefully as the belt. You need a secure place for the mouthpiece and enough freedom to turn your head without tugging the system. Follow the pack's intended routing rather than improvising a loose tube around moving bicycle parts.
Verdict: Buy a lumbar hydration pack if its loaded waist fit stays comfortable in your riding position; skip it if the belt shifts or presses uncomfortably.
3. Hydration vest: best for close-fitting carriage
A hydration vest wraps around your torso, with storage distributed through its back and front sections. Some designs use a rear reservoir, some carry soft bottles, and some support both arrangements. Confirm the specific design instead of assuming a vest includes every drinking option.
A vest earns its place here for fit, not because running equipment automatically suits cycling. Your torso angle changes on a bike. Front pockets, fastenings, and bottle placement need a check while your hands are on the handlebars.
Hydration vest pros:
- Offers close-fitting carriage around the torso.
- Front storage can make small items accessible while stopped without removing the vest.
- Gives you an alternative when conventional backpack straps feel awkward.
Hydration vest cons:
- Front bottles or pockets can feel intrusive in a bent-forward position.
- A close fit can feel restrictive when adjusted poorly.
- Hydration components and storage arrangements differ between designs.
Best for: Riders who prioritize a body-hugging setup and confirm that its layout works on their bike.
Try the vest over the clothing you intend to wear for your 2026 event. Check breathing comfort, fastening pressure, and access to jersey pockets. A good standing fit is not enough if you cannot reach your usual essentials once you start riding.
Verdict: Buy a hydration vest only after a loaded cycling-position check; skip a design whose front storage gets in your way.
4. Cargo hydration backpack: best for extra ride essentials
A cargo hydration backpack combines a reservoir system with more storage for clothing, food, or equipment. It belongs on the shortlist when your event's requirements exceed what a compact pack can comfortably organize.
Choose this category from a packing list, not from anxiety about being unprepared. Extra space is helpful when it holds a necessary layer or required equipment. It becomes a disadvantage when it encourages you to carry unrelated belongings throughout the ride.
Cargo hydration backpack pros:
- Provides room for additional clothing and ride equipment.
- Can keep a larger packing list together rather than spread across several locations.
- Offers more opportunity to separate items when the actual layout includes suitable compartments.
Cargo hydration backpack cons:
- Adds bulk on your back compared with a smaller suitable setup.
- Makes it easier to bring items you do not need.
- Requires careful packing so hard objects do not press toward your back.
Best for: Riders whose confirmed event requirements include additional clothing or equipment.
Put bulky soft items where they do not distort the fit, and secure hard equipment so it cannot move freely. Then check reservoir removal with the pack fully loaded. A pack that only refills easily when empty is a poor match for repeated stops.
Verdict: Buy a cargo hydration backpack when your packing list requires it; skip the extra space when a compact pack handles the same essentials.
Before ride day: fit, fill, ride, clean
Do not make the charity event your first loaded outing with a new hydration pack. Use this preparation sequence before your 2026 ride, then change anything that distracts you from controlling the bike.
Fit
Wear your intended riding clothes and adjust the loaded pack. Lean forward, look over each shoulder, and stand as you would on the pedals. Check for pressure at your neck, shoulders, chest, or waist rather than tightening every strap automatically.
Fill
Fill and close the reservoir according to its instructions. Check the closure, hose connection, and valve for leaks before packing electronics nearby. Leave the tube secured, not dangling where it can snag.
Ride
Take the pack on a familiar practice route. Test tube access only where you can do so safely, and stop to adjust anything that moves. If you keep thinking about the pack instead of the road, correct the fit or reconsider the design.
Clean
Empty, clean, and dry the hydration components according to their instructions. A wide opening helps only if you actually use it to reach the surfaces that need attention. Store the system dry rather than leaving a used reservoir closed inside the pack.
How these options are ranked
The ranking puts general usefulness first: loaded fit, drinking access, refill access, practical storage, cleaning, and route suitability. Compact backpacks lead because they combine hydration and modest storage; the remaining types serve distinct preferences or packing needs.
This is a design-based guide, not a product test or a claim that one manufacturer's pack outperforms another. Individual construction matters. A poorly fitting compact backpack loses to a well-fitting alternative that meets the same ride requirements.
Which cycling hydration pack should you choose?
Choose a compact cycling backpack when you need a default. Move to a lumbar pack when keeping your upper back clear is the deciding factor, a vest when close-fitting carriage works better, or a cargo backpack when required equipment needs more space.
For cycling hydration packs for charity rides in 2026, ask the organizer about refill locations before choosing your water load. Also confirm route conditions and any required equipment. A pack's capacity cannot answer those questions for you.
If you already own a suitable pack, keep it after checking fit, leaks, tube routing, and cleaning access. Buying something new is not a requirement for showing up prepared. Therideforhope's mission centers on mental health awareness and community connection; your equipment should help you participate, not turn participation into a shopping assignment.
FAQ
What's the best cycling hydration pack for a charity ride?
A compact cycling hydration backpack is the best default when you need water and modest gear storage together. Choose a different format when waist placement, close-fitting carriage, or additional storage is your priority.
Is a lumbar hydration pack better than a backpack?
A lumbar hydration pack is better for riders who want their upper back clear and can achieve a secure waist fit. A backpack is the better choice when the lumbar pack cannot comfortably carry the required equipment.
Can I use a running hydration vest for cycling?
You can use a hydration vest for cycling if its loaded fit and storage layout work in your riding position. Check front-pocket interference, breathing comfort, tube routing, and access to your clothing pockets before the event.
How much water should I carry for a charity ride?
Base your water load on refill access, ride conditions, and your personal needs rather than a universal amount. Confirm refill locations with the organizer and remember that each liter of water adds approximately a kilogram to your load.
Do I need to buy a new hydration pack for a charity ride?
No, a suitable pack you already own is a valid choice. Check its loaded fit, closures, hose connection, valve, and cleaning access before deciding whether replacement is necessary.
Are cycling hydration packs better than water bottles?
Cycling hydration packs are better when you want back- or waist-mounted water carriage alongside gear storage. Bottles avoid a wearable load, but your choice also depends on bicycle compatibility, refill access, and safe drinking habits.
Does Therideforhope sell the hydration packs in this guide?
This guide compares pack types rather than listing Therideforhope hydration-pack products. Therideforhope offers branded cycling and lifestyle merchandise and community ride events supporting mental health awareness.
ONE LAST THING
Check how the reservoir comes out after you pack everything else. Refill access is easy to overlook during a fitting session, yet it is something you will use at a water stop. You want to refill, close the system securely, and rejoin your group without unpacking belongings onto the ground.
Prepared does not mean carrying everything. It means carrying what your ride needs—and knowing how to use it.